Welcome to my first craft post! I’m excited to share my Disney inspired crafts with you. I’m typically a pretty simple crafter, I like the instant gratification of seeing a project done 😊
That means that most of the crafts I post will likely take a short amount of time (not over several days); and will have easy to acquire supplies.
I hope you enjoy these as much as I enjoy making them!
Disney Memories Box
Supplies:
Photo Box – I got mine from Michael’s – one on sale, and the other after Christmas (can we say clearance!)
Disney Vinyl – Joann’s – again on sale for both the Toy Story and Star Wars sets
Scissors
Exacto Knife (not pictured)
A credit card or gift card (this will help smooth the vinyl)
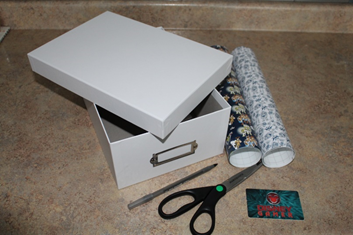

This is my clearance box ($1.80!). Don’t worry about the pattern, you are covering it up!!
Step 1: This is the hardest step as far as I’m concerned. You will need to figure out which vinyl pattern you want on your lid vs. the box. Do you want two separate patterns, or one?
Once you figure that out, it’s time to measure.
Step 2: Luckily, Cricut vinyl has a grid on the back, so I laid my box lid down on the vinyl and cut off the excess. You will want the vinyl to wrap all the way around the edges, going into the inside of the lid. The vinyl I bought would wrap around most, but not all of the lid.

When placing the vinyl on the lid, I start in the center of the lid, then I take my credit card and smooth the vinyl on from the middle to the outside, working any bubbles out of the vinyl. Once the top of the lid is covered to your satisfaction, smooth the vinyl on the long edges, but DON’T fold it to the inside of the lid.
Step 3: You will need to cut the vinyl in order to fold over the edge into the inside of the lid. See the picture for a description:

You will need to cut all four corners in the fashion. Once all four corners are cut, fold the vinyl into the inside of the lid:

Step 4: Again, you will need to cut the corners of the vinyl, see picture for details:

Make this cut on all four corners.
Step 5: Fold the “short” side of the vinyl, smooth as needed.

Step 6: You can either cut off the excess vinyl; or fold it into the lid. I chose to cut mine off:

Repeat steps 5 and 6 for each of the corners.
Step 7: Fold the long side of the vinyl on each end, smoothing out bubbles as needed.

At this point your vinyl should be adhered to the lid as seen above.
Step 8: Measure and cut two vinyl pieces to cover the ends of the lid and smooth on. I cut mine a little taller than needed, so I could fold it into the lid of the box like I did with the other sides.

The finished lid with the unfinished box:

You can stop right here if you like the look and don’t want to go any further. I chose to cover the bottom of my box as well. Following basically the same steps to cover the bottom as I did the lid. The major difference was the front of the box with the metal piece that holds a label:

After I cover the long sides of the box, I cut a piece of vinyl to cover the front, again making it taller so I could fold the vinyl over the top and bottom edges. I laid the vinyl loosely over the metal; then used my exacto knife to cut around the metal piece. Once I had that cut out, I smoothed the vinyl down working from the metal piece out to the edges.

I took the other box and covered it in my Star Wars vinyl:


My Star Wars box didn’t have the metal piece for the label, so it made that box a lot easier to finish!
I’m happy with the way they turned out, and now I can store our Disney memories in a super cool way!
